![Image result for TEXT ANIMATED]](data:image/png;base64,iVBORw0KGgoAAAANSUhEUgAAAV8AAACPCAMAAABqIigoAAABAlBMVEUAAAD////cFDzaACLjFT5uCh7aACeNDSf88/T31tn99vbiVGjbADbbAC+Li4vfFD21EDHS0tIwBA1JBhRpaWmGDCV/f38ODg5VVVU8BRA3NzecnJyPABS8ETN8CyKkpKTSEzmlDy3o6Oi+vr7JEjeHh4dycnIYAgbLy8srKytNTU1CQkIeHh5dXV1EBhKFABRIAAhsAA9ZCBhmCRwiAwmZDilIAACzAB3RAB+FABwuPjy0ACfL1dRcAA1SBxYoAwrLACnb4uHl2tu/wcHhwsbivMBcPkKLeHrLsLO4n6KiABKkAB6eDiuvr6+6RlYxEBWKMz9wKTNLGyJ/Q0vsXHCYS1VTbL/jAAAF/0lEQVR4nO2de18aRxSGB1ylRSKKmniJiqAiCVortqlt6i3pLTXpLf3+X6WALLs7+57ZGcrq/OB9/nTOOXP2XRzWOWdWpQghhBBCCCGEEEIIIYQQQgghhBBCCCGEEEIIIYQQQsgkac2Py1UU5NzFb/PBp4tH5UyvhXg1Q7RsunmK26MWjMt+FGTHxW/3wWcXj5bETPexQ73VHyy6Zj9yz1Nc1de3OB7VmL7LVXu/UF+1A52CCyHRVZxo8PBrVB/rGnpXcZCruk+pbwvOXF0WEhVuxzAL6hsy0re3QsDxK5SmmhfyHA5T35BIX3WA3IQrxgIGXeNwNlOt7yn+AK+DNEt4MdkJx6lvSExfQbViK5XlhRBrMzTwV9+Fcfk9CvLGxe8yNvsBtPiQyvIDtHsWPczduOf/wE1+0g5ofzkuv0VBfnXx+yU2+8/Y5ERLcgOb/RRZvHfNPuR9nuL22CqMy7soyIqL31J8+iY0udWSFOKvRRbO2Yc0ctS2z/j6NjOvH5PQ90UD2hwmcjzKTECVndMfMuX6quf4qjtxG3wPCu2YCfUdkdRXHUOjvZjFNo6T+IxT3xGavm1s9Xpk0MHaJddo6jtC01dYIVZG4/grMHYD+kyhvhN5fpC9w4eDVzjKXjKGc/YheevbWdI5hCvidsruyKxQQ73ApFLAtzi8cLw+N7Qwh6mr2ENuzbRdftJKwO+TtskD6bticrCYsLA9GFuDY/FHXwH4uX9un1R+wMvdMnn8T32FB7C2PNTMitj7m89bfeFvllHft8BB/xvMxGso4tveyBIcKXQyQ2J9n2A1SPPnIuAPk8cn4PDJZcp/0ZSfz5RCP19c/Mci5N+fgeNfLknlxXoFUDN5LAOHHZNDijqa80CVAvxzC1aRp6E8/Xisg13Zqlnf9P5v1U3fK7QTHNxn7PqaQPXQYGb1VfuwVgTllUv4cahvglbdsgZSrdsFpL5JupaFKqG+nIL6auxbCRxvGzIy9frWNhHXYpBruxql1N+jM+X6Fqu43+sbOQruN9EU2pX9k0y7voI+pi9/3AKVSMN+1aG+KTYz3aun1lfhr75fzQGM+r5BHpiXpjjrC2bnBbtH3wFnKMDX9v75sV0opzHu7xwDB8xw11Hizux9l948FtkAV+HH/tlk9icF9kxx1InZ+cjonMTf/ckn1Fd9NPm+M/smob4QodchOwcd6gs5lF3dNsepL+RW9HQpOCnqixHqQX0+ul0F9QUYuzGya8ZxqK9roIZFVTOC+qYxrA59LKryEdQ3RWavlos8/urr3v9wa6+v6VsKtVEk+d7+Kvztf7h8BjDu7/wAHG5eQn6Uo3QraOI4FelwJ+AMBfBif+eJ6kMXFvULeDYO4+/+pNf1N6vehz7UN8m5lbz2YalvAtv+B8vuEuqrYbc69AOv2gWkvnHsVodB4LpdROobB68O+Hy9XYcJ9Y1xj5WswUe24NwmJPWNEF4EUZKa0tIvMEhDfSPwi0zqSmg5CWz+jPNX39Jj969fogkrg0bJWhWOXWbGVGfe9q9PZn/H/nwLPt0yON4iJFMovMqM6u/+zmOfz0J3pzA6I4QLytl3z9/9ycno2zhZw+iRMo7HCwcMzX1Aavr1FdGUEc4XZ57v1t8hozOz+i5Z+W6MDDp4hdBPIOtQ3wFCyS1e5sAvMMiq11PfPlv4xQ3JD6cQ3tztR30NnknphAe4snGFoL5K/NU/1uILD8G6WQLq2/vqEkxSkwldlSa5qK/0bhLwbCv1XRve+uGxvuUv0mScDwAeAuVI36MCtLgDMzRxLGQ6ZAMEL3uhb67nW+bmor2ZCjb4Fk3xHT7wItfr/T3fkuf5rPgJQVxyC+7hFMJOsPyuAn/3Jx9JX6nk5jSH/P7emdc3443fOjUhnHTgdtb1vcefR7k0gdIqytW4Gdf3CrsE8vl6XEUqVuu4GuevviV07t2o7xj/v6WOB03dOatCQPyRh9Ze6HteAhhLtvPIQ2LQf3MqDBoTk6aB976GLK27AwkhhBBCCCGEEEIIIYQQQgghhBBCCCGEEELIkP8AUhTNWaCryz8AAAAASUVORK5CYII=)
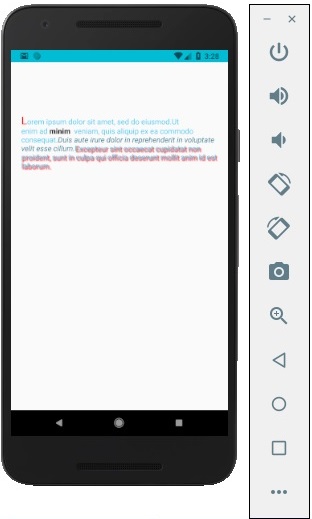
In this chapter, we will talk about Text component in React Native.
This component can be nested and it can inherit properties from parent to child. This can be useful in many ways. We will show you example of capitalizing the first letter, styling words or parts of the text, etc.
Step 1: Create File
The file we are going to create is text_example.js
Step 2: App.js
In this step, we will just create a simple container.
App.js
import React, { Component } from 'react'
import TextExample from './text_example.js'

const App = () => {
   return (
      <TextExample/>
   )
}
export default App
Step 3: Text
In this step, we will use the inheritance pattern. styles.text will be applied to all Text components.
You can also notice how we set other styling properties to some parts of the text. It is important to know that all child elements have parent styles passed to them.
text_example.js
import React, { Component } from 'react';
import { View, Text, Image, StyleSheet } from 'react-native'

const TextExample = () => {
   return (
      <View style = {styles.container}>
         <Text style = {styles.text}>
            <Text style = {styles.capitalLetter}>
               L
            </Text>

            <Text>
               orem ipsum dolor sit amet, sed do eiusmod.
            </Text>

            <Text>
               Ut enim ad <Text style = {styles.wordBold}>minim </Text> veniam,
               quis aliquip ex ea commodo consequat.
            </Text>

            <Text style = {styles.italicText}>
               Duis aute irure dolor in reprehenderit in voluptate velit esse cillum.
            </Text>

            <Text style = {styles.textShadow}>
               Excepteur sint occaecat cupidatat non proident, sunt in culpa qui officia
               deserunt mollit anim id est laborum.
            </Text>
         </Text>

      </View>
   )
}
export default TextExample

const styles = StyleSheet.create ({
   container: {
      alignItems: 'center',
      marginTop: 100,
      padding: 20
   },
   text: {
      color: '#41cdf4',
   },
   capitalLetter: {
      color: 'red',
      fontSize: 20
   },
   wordBold: {
      fontWeight: 'bold',
      color: 'black'
   },
   italicText: {
      color: '#37859b',
      fontStyle: 'italic'
   },
   textShadow: {
      textShadowColor: 'red',
      textShadowOffset: { width: 2, height: 2 },
      textShadowRadius : 5
   }
})
You will receive the following output −
