Monday, March 12, 2018

ReactJS - State

ReactJS - State


Image result for ReactJS - Environment Setup
Image result for ReactJS - Environment SetupImage result for ReactJS - state Image result for ReactJS - state

State is the place where the data comes from. We should always try to make our state as simple as possible and minimize the number of stateful components. If we have, for example, ten components that need data from the state, we should create one container component that will keep the state for all of them.

Using Props

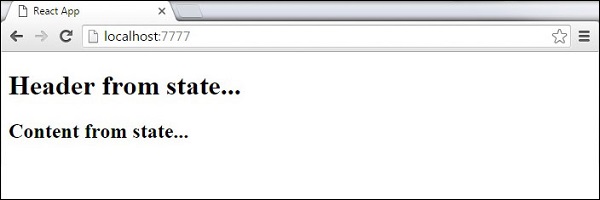
The following sample code shows how to create a stateful component using EcmaScript2016 syntax.

App.jsx

import React from 'react';

class App extends React.Component {
   constructor(props) {
      super(props);
  
      this.state = {
         header: "Header from state...",
         content: "Content from state..."
      }
   }
   render() {
      return (
         <div>
            <h1>{this.state.header}</h1>
            <h2>{this.state.content}</h2>
         </div>
      );
   }
}
export default App;

main.js

import React from 'react';
import ReactDOM from 'react-dom';
import App from './App.jsx';

ReactDOM.render(<App />, document.getElementById('app'));
This will produce the following result.
React State Simple
Continue reading

ReactJS - Props Overview

ReactJS - Props Overview


 Image result for ReactJS - Props Overview
Image result for ReactJS - Environment SetupThe main difference between state and props is that props are immutable. This is why the container component should define the state that can be updated and changed, while the child components should only pass data from the state using props.

Using Props

When we need immutable data in our component, we can just add props to reactDOM.render() function in main.js and use it inside our component.

App.jsx

import React from 'react';

class App extends React.Component {
   render() {
      return (
         <div>
            <h1>{this.props.headerProp}</h1>
            <h2>{this.props.contentProp}</h2>
         </div>
      );
   }
}
export default App;

main.js

import React from 'react';
import ReactDOM from 'react-dom';
import App from './App.jsx';

ReactDOM.render(<App headerProp = "Header from props..." contentProp = "Content
   from props..."/>, document.getElementById('app'));

export default App;
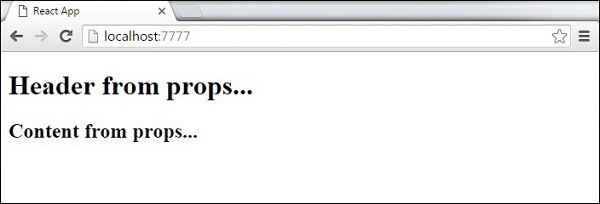
This will produce the following result.
React Props Example

Default Props

You can also set default property values directly on the component constructor instead of adding it to the reactDom.render() element.

App.jsx

import React from 'react';

class App extends React.Component {
   render() {
      return (
         <div>
            <h1>{this.props.headerProp}</h1>
            <h2>{this.props.contentProp}</h2>
         </div>
      );
   }
}
App.defaultProps = {
   headerProp: "Header from props...",
   contentProp:"Content from props..."
}
export default App;

main.js

import React from 'react';
import ReactDOM from 'react-dom';
import App from './App.jsx';

ReactDOM.render(<App/>, document.getElementById('app'));
Output is the same as before.
React Props Example

State and Props

The following example shows how to combine state and props in your app. We are setting the state in our parent component and passing it down the component tree using props. Inside the render function, we are setting headerProp and contentProp used in child components.

App.jsx

import React from 'react';

class App extends React.Component {
   constructor(props) {
      super(props);
      this.state = {
         header: "Header from props...",
         content: "Content from props..."
      }
   }
   render() {
      return (
         <div>
            <Header headerProp = {this.state.header}/>
            <Content contentProp = {this.state.content}/>
         </div>
      );
   }
}
class Header extends React.Component {
   render() {
      return (
         <div>
            <h1>{this.props.headerProp}</h1>
         </div>
      );
   }
}
class Content extends React.Component {
   render() {
      return (
         <div>
            <h2>{this.props.contentProp}</h2>
         </div>
      );
   }
}
export default App;

main.js

import React from 'react';
import ReactDOM from 'react-dom';
import App from './App.jsx';

ReactDOM.render(<App/>, document.getElementById('app'));
The result will again be the same as in the previous two examples, the only thing that is different is the source of our data, which is now originally coming from the state. When we want to update it, we just need to update the state, and all child components will be updated. More on this in the Events chapter.
React Props Example
Continue reading

ReactJS - Props Validation

ReactJS - Props Validation
 Image result for ReactJS - Props Validation     Image result for ReactJS - Props Validation

Properties validation is a useful way to force the correct usage of the components. This will help during development to avoid future bugs and problems, once the app becomes larger. It also makes the code more readable, since we can see how each component should be used.

Validating Props

In this example, we are creating App component with all the props that we need. App.propTypes is used for props validation. If some of the props aren't using the correct type that we assigned, we will get a console warning. After we specify validation patterns, we will set App.defaultProps.

App.jsx

import PropTypes from 'prop-types';
import React from 'react';
import ReactDOM from 'react-dom';

class App extends React.Component {
   render() {
      return ( 
         <div>
            <h1> Hello, {this.props.name} </h1>
            <h3>Array: {this.props.propArray}</h3>   
            <h3>Bool: {this.props.propBool ? "True..." : "False..."}</h3>
            <h3>Func: {this.props.propFunc(3)}</h3>
            <h3>Number: {this.props.propNumber}</h3>
            <h3>String: {this.props.propString}</h3>
         </div>
      );
   }
}
App.propTypes = {
   name: PropTypes.string,
   propArray: PropTypes.array.isRequired,
   propBool: PropTypes.bool.isRequired,
   propFunc: PropTypes.func,
   propNumber: PropTypes.number,
   propString: PropTypes.string,
};
App.defaultProps = {
   name: 'Tutorialspoint.com',
   propArray: [1, 2, 3, 4, 5],
   propBool: true,
   propFunc: function(e) {
      return e
   },
   propNumber: 1,
   propString: "String value..."
}
export default App;

main.js

import React from 'react';
import PropTypes from 'prop-types';
import ReactDOM from 'react-dom';
import App from './App.jsx';

ReactDOM.render(<App/>, document.getElementById('app'));

webpack.config.js

var config = {
   entry: './main.js',
 
   output: {
      path:'/',
      filename: 'index.js',
   },
   devServer: {
      inline: true,
      port: 8080
   },
   externals: {
      'react': 'React'
   },
   module: {
      loaders: [
         {
            test: /\.jsx?$/,
            exclude: /node_modules/,
            loader: 'babel-loader',
    
            query: {
               presets: ['es2015', 'react']
            }
         }
      ]
   }
}
module.exports = config;
Since all props are valid, we will get the following result.
React Props Validation Example As can be noticed, we have use isRequired when validating propArray and propBool. This will give us an error, if one of those two don't exist. If we delete propArray: [1,2,3,4,5] from the App.defaultProps object, the console will log a warning.
React Props Validation Error If we set the value of propArray: 1, React will warn us that the propType validation has failed, since we need an array and we got a number.
React Props Validation Error 2
Continue reading